Plausible + Astro: Simplified Web Analytics Guide
I must admit something: in many of the projects I’ve worked on or started from scratch, I rarely considered the importance of integrating a web analytics system. As a developer, it’s natural to want to dive straight into setting up the project, installing dependencies, and starting to code. However, once the product is built and deployed, a critical question arises: what now?
Having a detailed development plan and progressively adding new functionalities is viable, but from a business perspective, operating without an analytics system is like navigating blindly. Without understanding how users interact with your site, their impressions of new features, the number of visits to a specific page, or how many complete a purchase, we’re missing valuable opportunities to improve and adapt.
To illustrate the importance of web analytics, let me offer you this analogy:
Imagine being the captain of a vast ship sailing the oceans. Without a map, compass, or the ability to read the stars, it would be incredibly difficult to determine your direction. You risk going in circles or, worse, colliding with an iceberg. Web analytics work like your map, compass, and astronomical knowledge, providing you with crucial data to navigate successfully towards your goals.
With this in mind, I decided that for my next project, santychuy.com, it would be essential to delve into and apply a robust analytics system from the beginning. This decision would not only provide me with a clear vision of what users value and how they interact with the site but also allow me to make informed decisions for future improvements, increasing confidence in the product.
The Search for the Right Tool
Choosing the right tool was the next big step. The market offers many options, each with its strengths and weaknesses, which can be overwhelming. Among the most well-known options are:
- Google Analytics
- Mixpanel
- Matomo
- Posthog
After extensive research, my choice was Plausible.
Why Plausible?
Plausible stands out as a remarkably simple and accessible web analytics tool. Describing itself as “a simple web analytics tool,” my experience confirms that its simplicity does not sacrifice its ability to provide valuable insights. Although the platform can be scaled to meet more complex needs, the default metrics offer an excellent starting point for those new to the world of analytics.
A significant advantage of Plausible is its low learning curve, especially compared to other platforms that require several hours just to understand their basic operation. This accessibility was a deciding factor in my choice, as other platforms often introduce frictions that can discourage developers from implementing them in their projects.
For those interested in exploring Plausible, they offer a 30-day free trial period that you can use to evaluate how it adapts to your projects. Find more information about their pricing structure here.
I invite you to explore more about the benefits of Plausible by visiting its official site, where you’ll find a more extensive list of its features and advantages. For a deeper read, here’s a link to its detailed description.
With Plausible, implementing web analytics in your project doesn’t have to be complicated, allowing you to focus on what really matters: creating a valuable and engaging experience for your users.
Practical Example
In this section, I’ll guide you through a practical example to start monitoring user behavior in your application or website using Plausible Analytics.
We will use Astro as our development framework to build a basic webpage. Please note that this tutorial assumes you have some familiarity with Astro. Although the process is intuitive and not overly technical, a prior understanding of Astro will make it easier to follow the example and get the most out of this guide.
Step 1: Set Up Your Astro Project
-
Open your terminal and run
npm create astro@latestto create a new Astro project. -
Answer the initial questions by selecting the default options to configure your project.
-
Once created, open the project in Visual Studio Code or your preferred code editor.
Step 2: Preparing Your Main Page
-
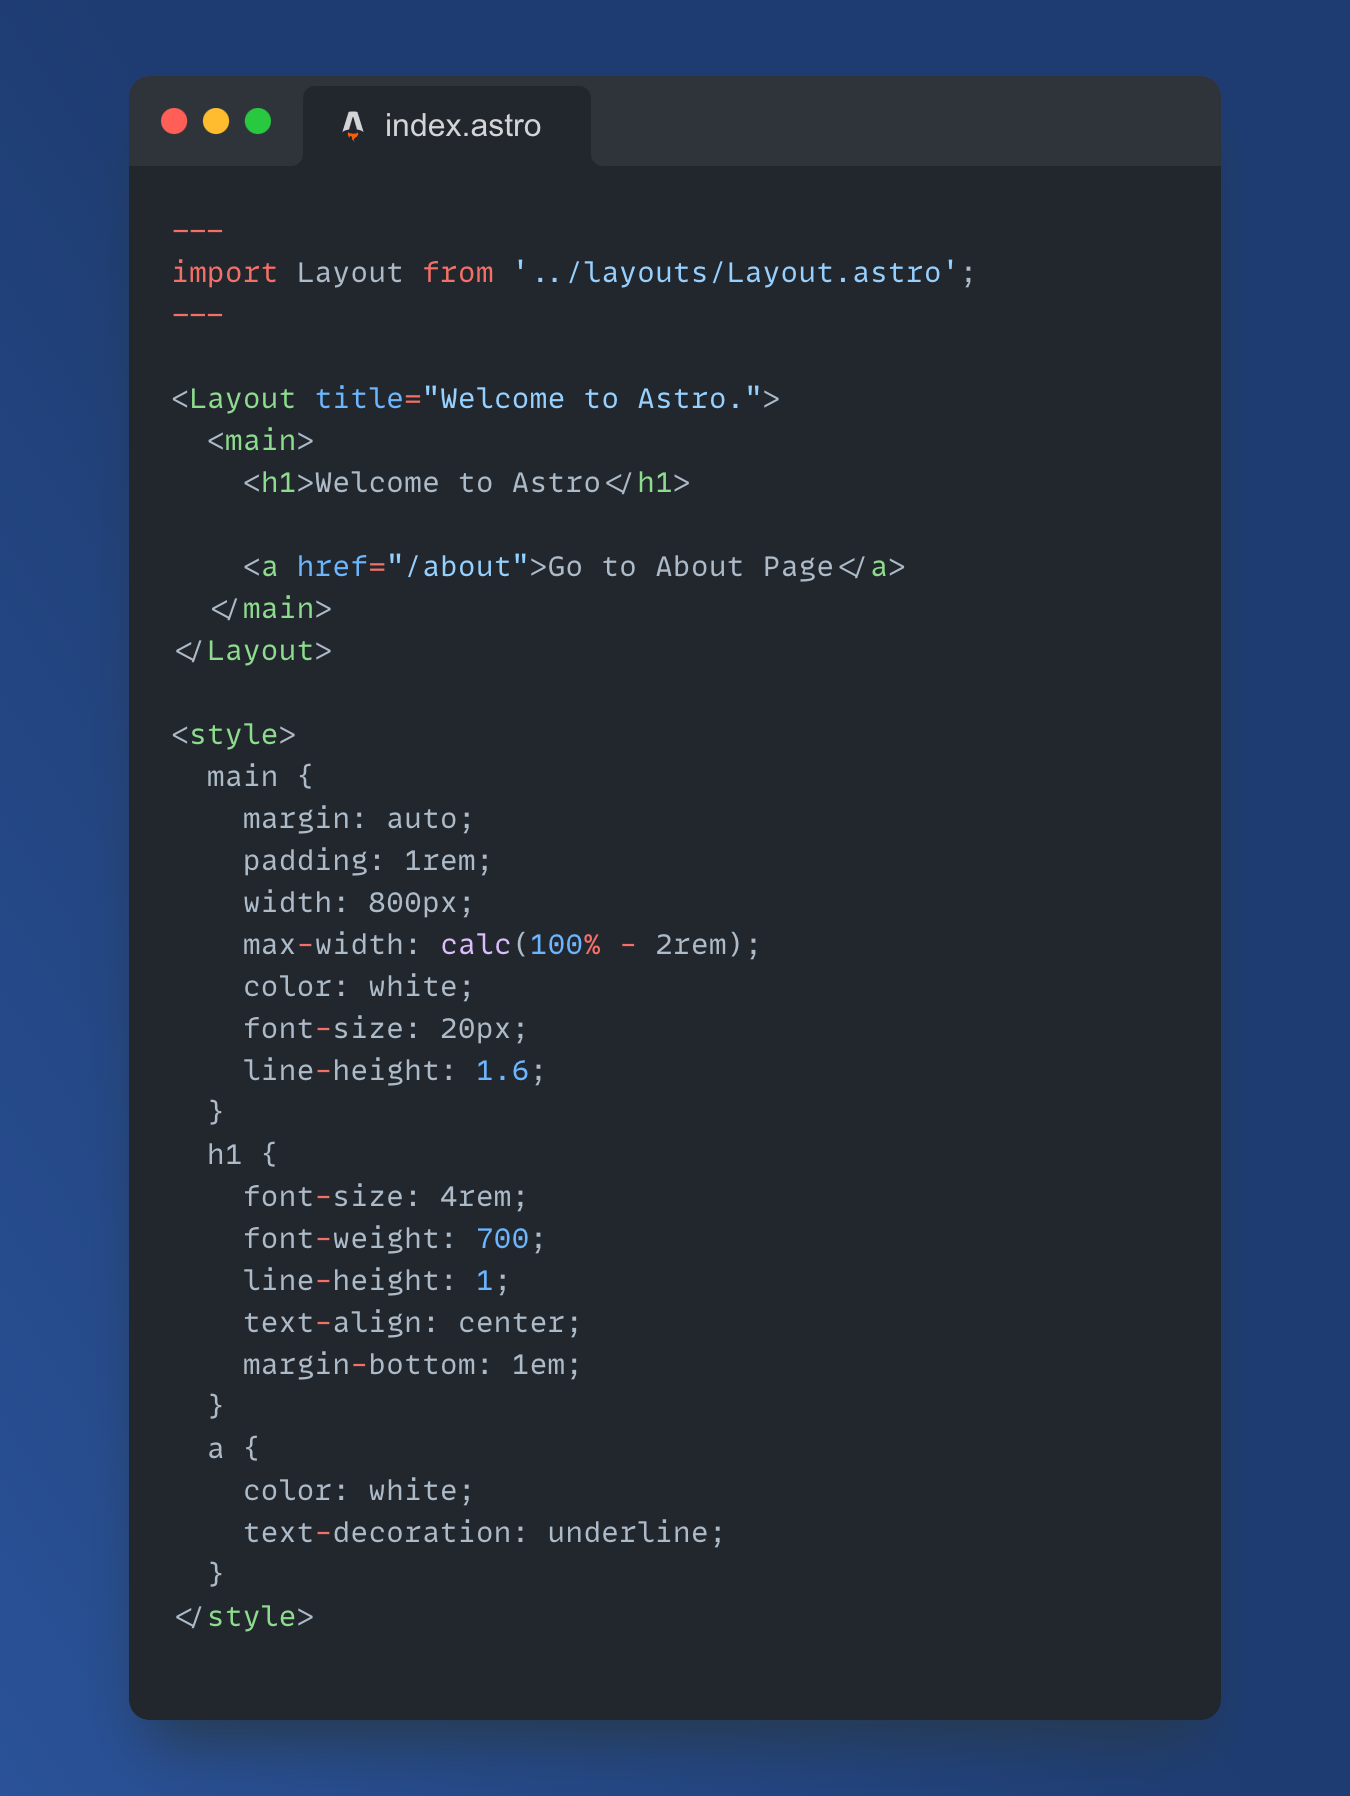
Go to the
src/pages/index.astrofile. -
Remove all unnecessary elements, leaving only the
h1element. -
Remove any unnecessary styles and add a link (
<a>) to the/aboutpage, ensuring the link is white. -
The code will look like this:

Step 3: Create the About Page
-
Create a new file in
src/pages/about.astro. -
Copy the content from
src/pages/index.astroand make the following modifications:- Change the
h1text to reference the about page. - Modify the link to direct to the homepage.
- Change the
Step 4: Register on Plausible
Before continuing, make sure you have created an account on Plausible. This step is crucial to proceed with the guide.
Step 5: Add Your Domain to Plausible
Follow Plausible’s instructions to add your website’s domain to your account.
An important point to consider is that the domain you register in Plausible functions more like a site identifier than an exact domain match. This offers flexibility in your setup.
Step 6: Plausible Script Integration
-
Add the following script within the
<head>...</head>element insrc/layouts/Layout.astro:<script defer data-domain="yourdomain.com" src="https://plausible.io/js/script.js" ></script> -
Replace
yourdomain.comwith the domain you registered on Plausible. -
For now, we will keep the
srcof the script as is, but we will return to this point later.
Step 7: Integration Verification
-
Run your site and open the browser’s developer tools to the Network tab.
-
Filter by JS to view only the JavaScript files and check if the Plausible script is loading correctly.
-
You might notice a script that throws an error. If we look into it, we see that it is indeed the Plausible script we are running, but why the error?
-
Remember when I mentioned earlier that we would make a change to the
srchttps://plausible.io/js/script.jswithin the script? That’s where part of the “problem” lies. -
The issue is as follows: the script we are pointing only track pages in production and will not track that are being developed locally; this makes sense as we do not want each time we are working on the project locally to be populating “test” data with real data. To resolve this and to verify locally that tracking is being done correctly, we will change the
srcvalue within the script to the following step.
Step 8: Configuration for Local Development
To allow Plausible to track your site in local development, change the src of the script to https://plausible.io/js/script.local.js. This will enable Plausible to track your local pages as indicated in the documentation.
Step 9: Verifying Tracking Locally
-
Launch your page again and check the Network tab to ensure the script is executing without problems.
-
Visit the
/aboutpage and then return to the homepage to generate visit data.
Step 10: Verify the Data in Plausible
Finally, access your Plausible account and go to your domain’s section to view the collected data. You will be able to see:
- The number of visits and their corresponding graph.
- The source of the visits.
- The most visited pages.
- The location of the visitors.
- The devices used.
- Goals and custom events.
Integrating Plausible into your project is not just a step towards optimizing your website; it’s an investment in the future of your online presence. It allows you to navigate confidently in the right direction, adjust your course according to the needs and preferences of your users, and ultimately, achieve the objectives of your project with greater precision and success. This tutorial aims not only to facilitate the technical process but also to inspire you to prioritize web analytics as an integral part of your web development strategy.
If you’re interested in delving deeper into this and scaling it even further, I invite you to read the documentation, which is very well written, to implement something more complex than what I’ve taught you.

